Play dough, It is one of the biggest things children love to play with. Along side things such as paint, dirt, and toys. My little one loves play dough, but I can not get my head wrapped around the price companies charge for those little tubs of colour.
The solution? Make your OWN!

Now you might be thinking, Play dough is technical!, I can't make that!
You would be surprised, it really isn't that hard at all. I DO recommend making it when your little one is either asleep/ entertained/ can't wander somewhere, as you can't leave the stove once this thing gets going, otherwise you will burn the mixture. But for kids that are interested in making it, and not just playing with the finished product, they will enjoy it!
The Ingredients:
1 cup Plain Flour
1/2 cup salt
2 tblsp (tablespoon) Cream of Tartar
2 tblsp Baby oil (makes the dough keep & makes it smell nice, makes a huge difference)
1 cup Water
Food coloring of choice
The Method:
1. Pour water into a pot, and add desired color, swirl around to mix.
2. Add flour, salt, cream of tartar and baby oil.
3. Turn heat onto medium, don't be tempted to turn it up high, or your dough will burn before becoming play dough.
4. The mix will be almost a liquid consistency, stir constantly until mix becomes a dough ball. Now you will need a bit of elbow grease towards the end. I used a butter knife to scrape the dough that forms around the wooden spoon, as it becomes hard to mix once you have a ball of it on the end of your spoon. Also don't stress about the layer of play dough that will form on the bottom of the pot, you won't get this off while trying to keep the dough mix moving around the pan.
5. Once the mix is cooked it will become a darker color then the liquid form. You'll know when your dough is ready to take off the heat, when your dough comes together as a ball, and you loose all the pale liquid mix, I just keep rolling the mix around until i'm certain it's gone.
The play dough cooling in the fridge. Notice the darker color & rough appearance.
6. Time to cool the dough. Your mix will be HOT!!!!!! So instead of picking up your mix to transfer to a container, I recommend placing your desired container on the counter & rolling your dough ball out of your pot & into it. No fingers please. I learnt the hard way. :) The mix will in no way look like the store bough play dough just now, be patient kiddies :). Place your containers in the fridge, and allow the dough to cool. No need to cover them, as the heat will cause moisture to build up, and the little skin that forms on the dough is easy rid of.
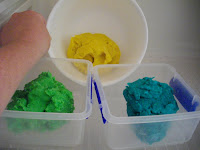
7. After your dough is cooled, knead your dough for around a minute or until smooth & it will now look just like the store bought stuff! :)

Storage:
I keep mine is glad ziplock bags. Tubs/ containers are also great. Any container that keeps air away from your dough does that job. Store in a cool dry place.
And there you go, homemade play dough & no compromise :)
Keep Happy
The Imagination Team

No comments:
Post a Comment