Pages

Thursday, November 18, 2010

Book Review - Treasure Hunt


Tilly loves treasure hunting - and so does her family. Tilly's mum hides Tilly's breakfast banana in the kitchen. Tilly's dad hides Tilly's toy rabbit in the garage. On Tilly's birthday, Tilly's grandma hides chocolate money all over the house and Tilly hunts for it. "My treasure!" she cries when she finds it. But at bedtime, it's Tilly's mum and dad who do the hunting! Allan Ahlberg's affectionate appreciation of family love and ritual finds the perfect match in Gillian Tyler's warm and delightfully detailed illustrations.

This is a delightful book, a combination of great story & hide & seek. Your kids will love it!

Keep Happy
The Imagination Team

Friday, November 12, 2010

Flying Fish

If your looking for a cheap & easy indoor activity, go for flying fish! They are so simple to make & Joshua just played with it for ages. He asked me to make more so I ended up making handfuls of them, he loved throwing around 5 of them all together. Too cute!

Here's how!

Materials
Page from an old magazine
Pencil
Ruler
Scissors

Directions
Using the ruler, pencil, and scissors, mark and cut a strip of the magazine page that is as long as the page and 1 inch wide.

Mark a line on each end of the strip that is 1 inch from the end.

Cut a slit halfway into the strip at each point. (At one end of the strip cut from the top halfway down to the middle, and at the other end cut from the bottom halfway up to the middle.)

Bend the strip into a loop and push the slits together so that the loop closes.

Toss the fish into the air to see it fly.

It's that simple!

Keep Happy
The Imagination Team

Friday, November 5, 2010

Christmas Craft.

With Christmas coming up fast, holiday craft need not be expensive!

Making little wreaths for the tree, like displayed here by Martha Stewart is great for children, even toddlers! It engages them in something fun, something that they can personalise with their own color scheme, and also helps develop their hand /eye coordination.

Photo Source: Martha Stewart.

Deck the doorknobs with jolly kid-made bells. It's a great activity for days when it's too wet or chilly to play outside and -- between your craft bin and the refrigerator -- you probably have all the supplies on hand: an egg carton, paint, glitter, glue, and yarn.

Bell How-To

1. Cut the cone-shape pieces that separate the eggs out of a cardboard carton (one egg carton will produce five bells).

2. Paint each divider, using acrylic or poster paint. Let dry; apply glue along the edge of the divider, all over the outside, or wherever you like, and sprinkle with glitter.

3. Thread an embroidery needle with yarn, poke a hole through a bell's crown, and pull yarn through partway. For a clapper, slip a jingle bell onto the end of the yarn; tie a knot above the jingle bell. Tie several bells around a doorknob, staggering the lengths of the yarn.

Keep Happy
The Imagination Team

Christmas Craft.

Thursday, November 4, 2010

Jelly

If your like me and buy Jelly in those small container at the supermarkets for your children, because they are portion controlled, I have found a cheaper way!

I started saving the tubs. Now that I have 6 of them, I just buy the packets of jelly, sometimes they are as cheap as 99c on special, that way you can really stock up!
If you always forget to make it in advance you can now also get cold water jelly which sets in just 30 mins.


I make the jelly & pour it into these tubs. So for 99c I get 5 tubs, which for me last a whole week! ( I only have one child) but you get the idea. If your feeling creative you could add fruit pieces to the bottom of the tubs before filling with Jelly. Kids love jelly. It certainly is cheaper then Ice-cream tubs. For families that have 3 or more children, this can save heaps of money throughout a year! There are heaps of flavors out there, so don't think your limited to just plain old lime or strawberry.

Keep Happy
The Imagination Team

Tuesday, October 26, 2010

Flower Tinting

This is such a fun activity to do with your little one. It also allows you to show your child how plants drink water through their stalks and where the water goes.

Materials
Clear vase or cup
water
food coloring
White carnation or daisy

Directions
1. Fill a clear vase or cup halfway with water and add enough food coloring to tint the water a bright colour.
2. Add the chosen flower and watch the flower change color over the next few hours. It's that easy!
You can also do this experiment with celery. In fact, this may be a great way to encourage a reluctant eater. After all, purple celery is bound to taste better then the green variety.

Keep Happy
The Imagination Team

Friday, October 22, 2010

World of Esty

At the Imagination Store, we are all for toys that stimulate children's ability to learn through play, so today we are looking at some products that come from the wonderful world of Esty.


1.Wooden Dinosaurs by Happy Squash Toys
2.Counting Acorns by Mama Mayl
3.Crayon Roll Up by My Sunshine Designs
4.Animal Farm Soap by Pure Heart Soap
5.Personalized Name Puzzle Step by Anne Marie Gifts
6.Wooden Memory game by Love Monkey
Keep Happy
The Imagination Team
*If you would like your product to be featured in the Friday Esty review by the Imagination Store, please contact us.

Thursday, October 21, 2010

Book Review - Possum Magic

“Once upon a time, but not very long ago, deep in the Australian bush, there lived two possums. Their names were Hush and Grandma Poss. Grandma Poss made bush magic


For 27 years Possum Magic has captivated and enchanted children and adults. Mem Fox’s lovable characters, little Hush and Grandma Poss, and Julie Vivas’ exquisite illustrations weave a story of pure magic. Continuously in print since it was first published by Omnibus Books on 31 March 1983, Possum Magic has been embraced as a timeless Australian tale and as Australia’s most-loved children’s picture book.


My little one loves this book, Grandma Poss makes Hush invisible with her bush magic, and their adventure starts. Making Hush visible again certainly becomes a lot harder then first thought possible.

Watching Joshua's face light up as he recognizes places, food the possum's eat, and trying to guess where they are going/ eating next makes the journey exciting. This is a well loved book on our bookshelf.


Possum Magic

Written my Mem Fox & Julie Vivas.

Available at all good bookstores or retailers.


Keep Happy

The Imagination Team.

Tuesday, October 19, 2010

Growing Strawberries

Growing strawberries with children makes for an exciting and educational activity. It gets them outside, great for keeping your home tidy, and them in some dirt, which they love. You can also turn this into a learning experience. Watching and recording how the strawberry plant grows and fruits will allow them to see nature at work, and after all that learning, they get to eat all that hard work.

I do recommend growing strawberries in a hanging basket. This keeps them off the ground when it comes to snails & slugs. I have also found it easier to keep ants at bay from eating all those scrummy strawberries before they are ready to be picked. Being in a hanging basket you can also have it at eye level for your little ones, it keeps them fascinated & wanting to keep the plant alive.

Strawberries are very easy to grow, you can get them at any good nursery/ garden centre, Australia wide. Some of the new varieties have pink flowers, but you can also get the classic white flowered plants. *The best time to plant strawberries is during April and May in most parts of Australia, but they can be planted at any time if you find them for sale in the local garden centre. In our warmer climate zones you can plant and harvest strawberries throughout winter.

The ideal spot for growing strawberries is in full sun, in well-drained soil. This is easy to achieve in pots, but if you prefer to have your plants in the vegi plot, that is just as good. If the drainage in your soil isn’t that terrific, create a raised mound of soil and plant the strawberries into the top of the mound. Strawberries are greedy feeders, so get them off to a good start, with either good potting mix, or if they are going into the plot, adding in plenty of compost and well-rotted manure (eg, bagged cow manure or Dynamic Lifter).

The best method to keeping your fruit clean is to lay straw under the plants (yes, that’s where the name strawberry comes from). Prolonged wet weather can cause fungal diseases, if in pots, just move your strawberries to a more sheltered position. For more wild weather I find using covers in the patch a good substitute (eg. 3Lt milk containers with the bottom cut off, weighted/ tied down. Remember to remove once the wild weather has cleared).

Getting your children out in the backyard, isn't only good for running off their energy levels, it also allows them to experience a whole different learning experience. Growing strawberries teaches them things like patience, observation, and caring for other things. Which can only help when they get older.

Keep Happy.
The Imagination Team

Playdough!

Play dough, It is one of the biggest things children love to play with. Along side things such as paint, dirt, and toys. My little one loves play dough, but I can not get my head wrapped around the price companies charge for those little tubs of colour.

The solution? Make your OWN!

Now you might be thinking, Play dough is technical!, I can't make that!
You would be surprised, it really isn't that hard at all. I DO recommend making it when your little one is either asleep/ entertained/ can't wander somewhere, as you can't leave the stove once this thing gets going, otherwise you will burn the mixture. But for kids that are interested in making it, and not just playing with the finished product, they will enjoy it!

The Ingredients:
1 cup Plain Flour
1/2 cup salt
2 tblsp (tablespoon) Cream of Tartar
2 tblsp Baby oil (makes the dough keep & makes it smell nice, makes a huge difference)
1 cup Water
Food coloring of choice

The Method:
1. Pour water into a pot, and add desired color, swirl around to mix.

2. Add flour, salt, cream of tartar and baby oil.

3. Turn heat onto medium, don't be tempted to turn it up high, or your dough will burn before becoming play dough.

4. The mix will be almost a liquid consistency, stir constantly until mix becomes a dough ball. Now you will need a bit of elbow grease towards the end. I used a butter knife to scrape the dough that forms around the wooden spoon, as it becomes hard to mix once you have a ball of it on the end of your spoon. Also don't stress about the layer of play dough that will form on the bottom of the pot, you won't get this off while trying to keep the dough mix moving around the pan.

5. Once the mix is cooked it will become a darker color then the liquid form. You'll know when your dough is ready to take off the heat, when your dough comes together as a ball, and you loose all the pale liquid mix, I just keep rolling the mix around until i'm certain it's gone.

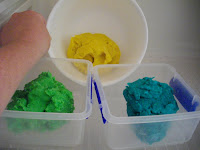
The play dough cooling in the fridge. Notice the darker color & rough appearance.

6. Time to cool the dough. Your mix will be HOT!!!!!! So instead of picking up your mix to transfer to a container, I recommend placing your desired container on the counter & rolling your dough ball out of your pot & into it. No fingers please. I learnt the hard way. :) The mix will in no way look like the store bough play dough just now, be patient kiddies :). Place your containers in the fridge, and allow the dough to cool. No need to cover them, as the heat will cause moisture to build up, and the little skin that forms on the dough is easy rid of.

7. After your dough is cooled, knead your dough for around a minute or until smooth & it will now look just like the store bought stuff! :)

Storage:
I keep mine is glad ziplock bags. Tubs/ containers are also great. Any container that keeps air away from your dough does that job. Store in a cool dry place.

And there you go, homemade play dough & no compromise :)

Keep Happy
The Imagination Team

LinkWithin

Related Posts Plugin for WordPress, Blogger...